Showing posts with label baking. Show all posts

Saturday, October 24, 2015

CSA Sunburst Squash Chocolate Cake or Anything Tastes Great With Chocolate!

Love California with it's year-round CSA boxes!  As you know, CSA boxes often mean you are on the receiving end of some fruits and veg that your grandma would have been familiar with, but you?  Not so much.  And the less you know about these foreign edibles, the more they seem to show up in your box!   For the last few weeks, our unusual veg has been the Sunburst Squash, aka Pattypan Squash (in yellow).  I do recall these from...my grandmother's garden.  They are great stuffed and roasted like an acorn squash but sometimes, that is just not what you are in the mood to eat.  I give you, Chocolate Cake.

2 cup grated pattypan squash
1 cup melted coconut oil
3 eggs
¾ cup white sugar
½ cup brown sugar
1 cup all-purpose flour
½ cup whole wheat flour
½ cup cocoa
¼ cup Greek yogurt or sour cream
2 tbsp. baking powder
1 cup chocolate chips


Instructions
Preheat oven to 350 degrees.
Grease and flour a 9x13 pan.
Grate the pattypan until you have about 2 cups of grated squash. If you shred with a food processor, you will have thicker shreds that might not melt into the batter but will still be tender and not distract from the chocolate cake.
Add the squash to a large bowl, and mix in oil, eggs, and both sugars until well incorporated.
Blend in flour, cocoa powder, Greek yogurt or sour cream, and baking powder.
Stir in chocolate chips.
Pour into the prepared pan and bake 30 to 35 minutes, or until a toothpick comes out clean.

Didn't even bother with a mixer

You can substitute many of the ingredients. If you are going way out in left field on your substitution, look it up to make sure you are keeping proportions correct with your new item rather than doing a straight one-to-one swap.  For example, just using straight whole wheat flour will result in a denser, and not necessarily moister, cake.  If you want to go all whole grain, try using whole wheat pastry flour.

Shreds visible.  It adds character 
I don't know about you, but I could just eat it with a spoon at this point!


Most shreds gone, remaining are tender.  No frosting needed!

Did you make it?  Let me know your variations in comments!


Sunday, March 16, 2014

Gingerbread! Tastes just like Christmas!

Living in Florida has really messed up my sense of season, so a recent cool snap made me think longingly of Christmas and baking and that awesome rediscovered Gingerbread recipe from KAF's Whole Grain Baking.  I made it a few years ago and then promptly forgot where I got the recipe.

an assembly of likely suspects
This is a very simple, no-mixer-required recipe so I gathered up the ingredients, greased and floured my 8x8 pan (calls for 9x9, but hey, you go with what you have), and heated the oven to 350F.

whisk this - I use pastry flour as it gives a nice moist crumb
Whisk dry ingredients:
2 1/2 cups traditional whole wheat flour or whole wheat pastry flour
1 tsp baking soda
1/2 tsp salt
1 tsp ground ginger
1 tsp ground cinnamon

mix this - in place of brown sugar corn syrup, I used brown rice syrup.  Oh, and I almost never have unsalted butter but as my salt is kosher salt, I've never had saltiness issues with my baked goods

Wet ingredients:
1/2 cup unsalted butter, melted
1/4 cup granulated sugar
2 tbsp brown sugar corn syrup
1 lg egg
3/4 cup  molasses
1 cup buttermilk

Pour wet into dry and gently stir until incorporated.  Ok, wait, that's what I do.  The recipe actually says "Stir in teh flour mixture until the batter is evenly moistened."  If anyone can tell me why adding dry to wet vs wet to dry matters, by all means, comment!

stir in extras
extras:
1/2 cup minced crystallized ginger
1 cup diced dried apricots

The crystallized ginger, purchased at Whole Foods markets in a resealable bag, is not optional.  The apricots can be omitted.  I have made the recipe both ways and love it either way, so personal preference abounds here.

Pour into the pan, bake until center is set for 45 to 50 minutes.  In my case, because of the deeper batter in the pan with less real estate, I go for the longer time.  Cool on a rack for 15 minutes before you dive in with a fork and spoon serve warm.  Leftovers go great with breakfast coffee!
best served with whipped cream...alas, I had none

Thursday, October 24, 2013

where bread illustrates mathematical error

When I last left you, I had two loaves worth of brioche dough left in the refrigerator. What is a girl to do?   Clearly the only option was to make up two more loaves!

Naturally, I had to pull out a single loaf of brioche.  A test, if you will.  The baseline. So I know what it tastes like without any fancy adornments. So two pounds of dough was removed, shaped, and dropped into a prepared pan for the rise.

This left me with a pound and a half of dough.  Quite the nice deal, this recipe.  It makes up enough for two fancy loaves of a pound and a half each and a two pound loaf of plain.  I had already made up the pumpkin loaf and wanted something a little more interesting.  Quickly flipping through the original Artisan Bread in 5 Minutes A Day turned up Chocolate Prune Bread.  Fantabulous!

So again, I dusted and pulled out my remaining pound and a half of dough and rolled it out to a half inch thick rectangle.  This is thicker than the Pumpkin Swirl Bread but there will be a lot more solid goods to be held by this rectangle!

1/2 inch thick brioche dough piled with 6 oz of bittersweet chocolate and 3/4 cup of chopped prunes
The directions were pretty clear at this point.  I was to roll the dough...

all rolled up and seam sealed

and then begin folding it up, turning between folds, and using the heel of my hand to press down.  Bits and pieces were to come out potentially and this was not to worry me.  It was all in the name of filling distribution.  Here, dear reader, is where geometry failed me.  I folded a few times.

see?  folded. And I even turned to get to this point

And I pressed a bit as well.  With my hand.  

and you can see where bits have made an appearance as it sits there in its greased and sugared pan, rising for 90 minutes under a loosely placed (and sprayed with canola oil) sheet of plastic wrap
Alas, there was not nearly enough turning.  And I can, in retrospect, see exactly how I created this tube of un-chunk-filled brioche running down the center of the loaf!

Picture the tube without the prune anomaly there in the middle.  All the goods were evenly distributed directly under the crust. 
But as you can see, I did not care!  It is one of the most delicious loaves I have ever had, much less created myself!  I will definitely be making this again, with ::ahem:: more folding and heel of hand pressing.  Anyway, 350F oven, for 40-50 minutes, remove from pan, allow to cool before cutting.  Bon appetit!

Sunday, October 20, 2013

let them eat brioche!

That's what Marie Antoinette actually said.  Brioche, that egg-n-butter enriched bread that apparently mistranslates to cake somewhere crossing the Channel.

A post by those awesome bread bakers over at Artisan Bread in Five Minutes A Day hit my feed with a recipe I could not resist.  Pumpkin Swirl Bread.  So, friends, here goes.  What you are about to see is not pretty.  But it was darn near polished off by 4 people in 24 hours.  There is a bare heel left for me for tomorrow with my tea!


I started off with the Whole Wheat Brioche from Healthy Bread in Five Minutes A Day.  This required some forethought on my account because the enriched dough needs to be refrigerated for 2 hours minimum.  I went with overnight.  And while we are talking about my deviations, I also used two egg beater servings (1/4 cup each) in place of two of the eggs and canola oil instead of butter.  The dough seems none the worse for it.  At any rate, whatever brioche you use, you will need 1 1/2 lbs of it.
Filling!  1/2 cup pumpkin puree,  1/4 cup brown sugar, and 1 1/2  tsp pumpkin pie spice.

Take your pound and a half and roll it out to a rectangle, 1/4 inch thick.  Yes, I got a ruler.  Yes, that's as rectangular as I'm gonna get rolling out bread dough!
Spread filling and roll it up tight and pinch the seam to seal it up.  This is messy, folks.  You will be licking spiced and sugared pumpkin puree off your fingers when you are done (she says this like it's a bad thing!)
So far so good, right?  Here's where it all really starts to fall apart!

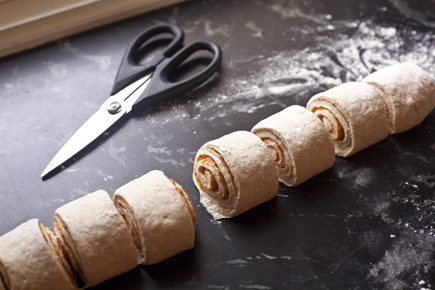
You know those cute photos of easy-to-make, pretty things on Pinterest?  Yeah.  Cut your jelly roll of brioche dough and pumpkin mess into ten equal pieces.  Somehow, this looks a lot less like their photo and a lot more like something that flew through the air and stuck to a Spock in Star Trek episode 29, Operation:  Annihilate!  ::ahem::
Nonetheless, I trudged on, placing six pieces facing outwards along the sides of the pan and the remaining four on top.  The hope was that they would rise to the challenge and glue themselves together.
After ninety minutes...
And after 50 minutes in a 350F oven!
So, while nowhere near as pretty as the nice people who make a living doing it, the Pumpkin Swirl Brioche was every bit as tasty as I hoped!  And its adorable, cinnamon roll meets bread pan look gives me ideas for other things!  And as for looks, I have this sneaking suspicion that somewhere between rolling the dough up and cutting it into ten parts, there was some refrigeration time to firm the whole thing back up.  I may try that on my own next time.

If you make this, please include photos in your comments!

Saturday, October 27, 2012

loafing off


I make most of my bread using the Artisan Bread in 5 Minutes A Day series.  I can't recommend this enough, especially for novice bread makers.  And for the newbies, while this method uses bread science, it is not like you make most bread!

Flipping through the Healthy Bread book one afternoon, I noticed the Quinoa Bread that I'd been meaning to try and realized I had a lovely, warehouse-sized bag of quinoa in my pantry.  I have aspirations to healthy eating!  So I break out my big bowl and mix it up.

Quinoa Bread (Healthy Bread in Five Minutes a Day - Hertzberg/Francois)

3 cups white whole wheat flour
3 ½ cups all purpose flour
1 cup quinoa, rinsed an uncooked
2 packages yeast
1/4 cup vital wheat gluten
3 ¾ cup lukewarm water
1 tbsp Kosher salt

In this method, you combine the ingredients, sometimes blooming the yeast, sometimes not, and leave it on the counter for 2-ish hours to rise.  You absolutely do not knead this over-saturated dough.  For more information on the method, there are links at the bottom of the page.  

Me being me, I forgot it and left it overnight and half the next day under a cookbook and my glasses before I was unearthing my counters from the previous days' shopping and realized it was there.  I make up 4 loaves at a time because my current refrigerator lacks the room for my big bowl so I have not been able to follow the "daily bread" thing this recipe does so well.  The rising loaves rested tucked under a kitchen towel for 45 minutes, as per the non-refrigerated dough rest time (well, it wasn't!) on parchment paper because I never seem to have enough cornmeal around to let it rest on that, and then dusted them heavily with white flour to help hold the shape.  

Side note here - this is an unfortunate tendency that my loaves made using this method tend to be flatter than I want them to be.  I had hoped that was an artifact of high altitude baking, but alas, I've had it happen at the very very sea level Florida house as well.  Fortunately, the bread still tastes great and toasts perfectly and is not, in fact, a "flat" bread so occasionally I take a stab at one of the many trouble shooting tips for this problem.

The oven was pre-heated to 450F until I remembered it was on (the kitchen started to get hot) at which point, I brushed loaves with water (chewy crust technique part one), and made expansion hash marks so the bread wouldn't develop into any post-nuclear mushroom cloud formations. Then I placed the bread into the oven and dumped about a cup of warm water in the general direction of the overheated small broiler pan bottom I keep in the oven for this reason.  Most of the water hit the bottom of the oven anyway, but the requisite steam (chewy crust technique part two) was created.  It cooked for 30 glorious bread-scented minutes and, after it cooled, sliced up nice and moist, holding together beautifully as a slice. 

This bread stands up to my "burnt toast" treatment, as my family calls it. I like my toast actually toasted, you know, like it's seen the inside of a toaster and learned it's lesson well.  None of that limp bread that disintegrates under butter, please!  ::ahem::

The quinoa does not seem to contribute in any appreciable way to the taste of the bread, just to the moisture.  Oh, and it might be good for you!  You can check out their blog, check out their books from the library, or just go out and buy them.  If you like bread at all, you won't be disappointed!


Half my loaves, already gone!  Also, for size comparison, that is a big knife with a  9" blade!

Friday, October 26, 2012

on the table

Time to catch up with all those odd things I have been doing and forgetting to post about!  

So what to do when you have some lovely portobello mushrooms and don't want the vegetarian mock burgers you can make with them?  Create a healthy version of that faithful side:  fries.

The assembly line:  be sure to use the left hand for the egg wash and the right  to toss the mushrooms in the cornmeal mixture or you will end up with ugly globs of egg wash/cornmeal on the ends of your fingers!


Wipe down your mushrooms and give the stems to the spotted wagging dog who shadows your kitchen adventures.  Slice them into french fry-like size, drop them in an egg wash (in this case, pour out some Egg Beaters), and then lift them over to a cornmeal/salt/pepper/sweet paprika coating before dropping them on a stone.  20 minutes or so in a 400F oven and check the mushrooms for doneness.  You may like them moist or you may find you want them a little drier.  Don't forget to salt them again while they are hot!  I eyeball the seasonings, knowing what I tend to use when cooking.  A little experimenting, and you will realize you know this as well!

Before they went into the oven...sorry, they didn't last long enough to get a photo after cooking!
A couple going-going-not-quite-gone apples and some dried diced plums (yes, prunes!  It's all about the marketing!) resulted in a spontaneous dessert.  I cored and sliced but did not peel apples until the baker was full (smaller, 6 cup capacity covered stone baker - perfect for family of 4 to 6 dessert portions).  Then I mixed together:  1/4 cup of brown sugar, a splash of maple syrup, 1 tsp cinnamon, and 2 tbsp of lemon juice.  This mixture went over the apples.  On top, the standard crumble topping of 1/2 cup oatmeal, 1/2 cup flour, 1/4 tsp salt, some cinnamon and optional nuts to your preference.  Cut 4 tbsp butter into the dry ingredients.  Bake for 45 minutes or so in a 350F oven. 

before oven
I promise I will get better at taking the "after" photos!

Thursday, October 11, 2012

smart cookie

Early in our marriage and shortly after the birth of our first child, my husband came home after a very long day and raved about another woman's cookies.  Let me say that again, because it bears repeating...he raved about another woman's cookies.  It seems that Sara, the wife of one of the guys in his pilot training class, had made a batch of oatmeal chocolate chip cookies for them to snack on during their study group.  And apparently they were...rave-worthy.

Now I knew a thing or two about cooking.  And cookies.  I had a perfectly good chocolate chip cookie recipe of my own (don't we all?) that involved peanut butter.  They melted in your mouth.  And my husband had tried them.  The next day, he was still talking about Sara's cookies.

There was nothing I could do but reluctantly get the recipe.  I'd make the two cookies side by side.  I'd show him.  I picked up the phone and called Sara.


I made those cookies.  I let them cool on the rack until I could pick one up without it falling apart.  I took a bite.


And I realized- smart cookies don't crumble, they just pour a glass of milk!

Thanks Sara, where ever you are, for a fabulous cookie recipe I have been making for almost a dozen years.

2 cups flour, 1 tsp soda, 1 tsp salt, 1 cup margarine, 1 cup sugar, 1 cup brown sugar, 2 tsp vanilla, 2 eggs, 2 cups chocolate chips (12 oz bag), 2 cups oats, 1 cup chopped walnuts Bake @ 350F for 8-10 min

Modifications I have made over the years:  cream butter (I can't bring myself to use margarine for anything, sorry my southern-raised friends!) and sugars together until light and fluffy, add eggs and vanilla.  Whisk flour, soda, and salt together and add to mixer 1/2 cup at a time.  Mix chocolate chips (Ghirardelli Bittersweet), nuts (optional) and oatmeal in by hand.  Cooking time varies by cookie sheet, stoneware yields a better cookie.